Mouse RNASeq DeSEQ2 pipe
General Workflow:
- Transfer data to Cyverse Discovery Environment
- Gunzip your files
- FastQC
- Hisat2 (index and align)
- HTSeq Count
DeSeq2
Example Data
Example data to be used with this tutorial can be found here: Community Data -> iplantcollaborative -> example_data -> Mouse_RNAseq_DESeq2
How to Transfer your files to Cyverse Discovery Environment (DE)
There are multiple ways to transfer your files (either locally from your computer or from the UAGC data storage space). Below are the most common methods. If you are unfamiliar with the command line, I would suggest using Cyberduck. If you are familiar with the command line, I would suggest using iRODs.
- Transfer using Cyberduck: https://pods.iplantcollaborative.org/wiki/display/DS/Transfer+data+between+AWS+and+CyVerse
- Transfer using iRODS/iCommands: https://pods.iplantcollaborative.org/wiki/display/DS/Using+iCommands
How you know that your files are transferred correctly:
- Login into Cyverse Discovery Environment
- Click on the Data (cloud icon with up and down arrows) icon on the left-hand side
- Check to see that all your files have been transferred to the DE

Interpreting your files' names and understanding what it means:
- Abbreviations: XXX= non-specific filler name (used to indicate that something is there but might be different for everyone), YYYYYYY
- Typical format for Illumina data
- XXX_YYYYYY_L00X_RX_001.fastq.gz (the .gz extension indicates it's a zipped file so you would need to GUNZIP the file before proceeding; THIS IS RAW FASTQ FILE)
- XXX_YYYYYY_L00X_RX_001.fastq (regular fastq file, you can proceed to the FASTQC section)
- XXX= usually a name you provided for your samples --> ie: untreated1
- YYYYYY=specific to each sample (it's the barcode used to label your sample)
- L00X=the lane your samples were run on
- RX=X could be 1 or 2 where R1=run1 (forward sequencing) and R2=run2 (reverse sequencing)
- .fastq= the output file for RNASeq is a fastq file (a type of file extension)
- Processed FASTQ Files
- Some sequencing facilities perform a simple trim on your fastq files to remove barcodes and adapters from the sequence and to filter very poor quality sequence.
- If your reads have not been trimmed and filtered you can use Trimmomatic to do it.
- In the case of this data the processed files are either:
- pair.XXX_YYYYYY_L00X_RX_001.fastq.gz (pair-end)
- sngl.XXX_YYYYYY_L00X_RX_001.fastq.gz (single-end)
Gunzip your Files (Unzip your Files)
If your files are not unzipped (meaning they have a fastq.gz extension), follow the below protocols to unzip your files.
Steps:
- Click on the Apps Icon
- Type "gunzip" into the search bar located near the top
- Click on "Uncompress files with gunzip" by Matthew Vaughn

How to input your files and process the gunzip:
- Analysis Name: You can change the name of your analysis, I usually keep the name of the App I'm using so I remember what kind of analysis it was
- Comments: You could include comments/notes for yourself
- Select output folder: You can browse and tell the computer specifically where you want your analysis to go once it finish processing (I usually select the default)
- Retain Inputs? If you want the computer to copy the initial input files into the final analysis result folder, check the box (If you don't want it to copy the files, leave the box uncheck)
- Dropdown Menu: Click on the dropdown arrow to move to the next section

Gunzip Inputs:
- Click on the "Add" button
- A directory will open and you can search for the fastq.gz files you want to unzip
- Click on "OK" and it will load the files you chose
- The "Names" box will load all the files you inputed into the box
- I keep the settings as the default: If you want to change the setting, read the manual of GUNZIP here:Uncompress files with gunzip 1.6-2
- Click "Launch Analysis" once you are ready for the computer to start the analysis. (Repeat steps 1-4 as necessary until you have all the files you want loaded)

Gunzip Outputs:
You'll have unzipped files in your analyses file. You can move those files to another folder if you choose to.
FastQC
FastQC is a tool to evaluate the quality of your sequencing data. More information on using FastQC.
Steps:
- Click on the Apps Icon
- Type "fastqc" into the search bar located near the top
- Click on "HTProcess-fastqc-0.2" by Roger Barthelson
Input File Types:
- Move all your forward .fastq files to one folder for the easiest analysis
- Move all your reverse .fastq files to one folder for the easiest analysis
- Move all your unread .fastq files to one folder for the easiest analysis
- Follow through the app directions on how to input the files
Output File Types:
- In your analyses folder, click on "HTProcess-fastqc-0.2"
- Click on "individual report"
- You will see "XXX_report_html" as your readout file for the quality of your reads
Hisat2
In this tutorial we will be using Hisat2 to index our genome sequence and align our reads to that indexed sequence.
Steps:
- Get the latest mouse gtf file from Ensembl or Entrez (depending on your analysis): Ensembl
- Download and/or transfer the gtf.gz file to your DE (the example data for this tutorial uses chromosome 3 only)
- Click on the Apps icon
- Type "hisat2" into the search bar located near the top
- Click on "HISAT2-index-align-2.1" by Kapeel Chougule
Input File Types:
- Move all your forward and reverse .fastq files to one folder for the easiest analysis
- Input your first forward file, and input your first reverse file, for "Fragment Library", select "forward-reverse" if you put the forward file first and the reverse file second
- For "File Type", select PE (paired end) or SE (single end) depending on what files you inputted
- Repeat steps 1-3 for all your samples (ie: untreated 1, untreated 2, untreated 3 , treated 1, treated 2, treated 3). If you had those conditions, you would need to repeat 6 times.

Output File Types:
- In your analyses folder, click on "HISAT2-index-align-2.1"
- You will see "XXX.paired.bam" files for your proper alignments
- You will also see a "XXX.paried.bam.bai" index file corresponding to each BAM file.

HTSeq Count
Once you have aligned your reads you need to determine the number of reads that mapped to each gene/transcript. For this, we will use 'HTseq count'.
Steps:
- Click on the Apps icon
- Type "htseq" into the search bar located near the top
- Click on "HTseq-count-0.6.1" by Upendra Kumar Devisetty
Input File Types:
- Move all your .bam files to one folder for the easiest analysis
- Select all your .bam files for your input and put your .gtf file as the GFF file
- Select:
- Input file type: bam
- Sorting order of alignment: name
- Everything else: as default


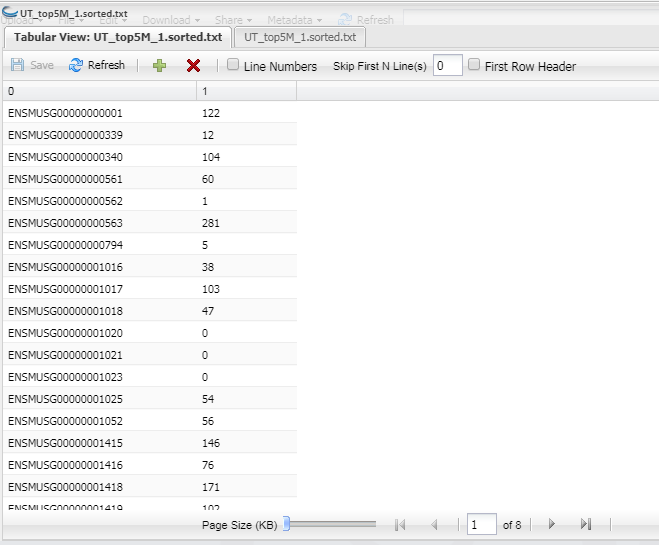
Output File Types:
- In your analyses folder, click on "HTSeq-count-0.6.1"
- You will see "paired.sorted.XXXX.txt" files for your counts . This will be your count matrix

Example of Count Matrix for UT_top5M_1.sorted
DESeq2
Now that we know the quantity of each transcript in each sample we need to compare those quantities between samples. For this we will use DESeq2.
Steps:
- Click on the Apps icon
- Type "deseq2" into the search bar located near the top
- Click on "Deseq2 (multifactorial pairwise compairson" by Upendra Kumar Devisetty
Input File Types:
- Move all your paired.sorted.XXX.txt files to one folder for the easiest analysis
- Select all your paired.sorted.XXX.txt files for your input (you can not do 27 pairwise at the same time, select smaller sets of samples for your pairwise comparisons)
- Need to create a target file: look below for image
- Select:
- Reference Biological condition: probably whatever the name is for your untreated/control samples
- Everything else: as default


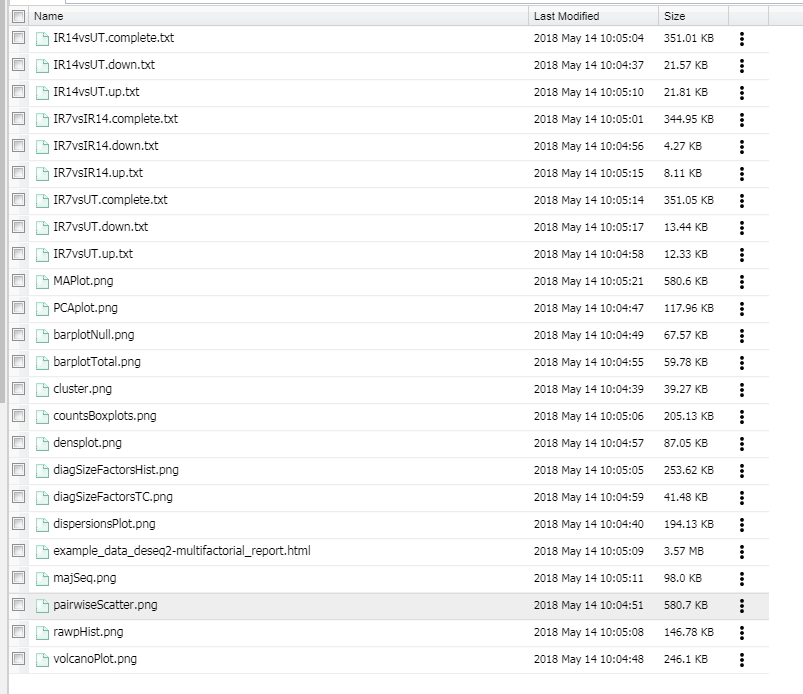
Output File Types:
- In your analyses folder, click on "Deseq2(multifactorial pairwise comparison)"
- You will see "XXX.complete.txt" which has all the genes and your pairwise comparison
- You will see "XXX.up.txt" are genes that are upregulated in your pairwise comoparison
- You will see "XXX.down.txt" are genes that are downregulated in your pairwise comparison
Related articles