Using Datasets
A dataset is a collection of links to stored elements — files, images, mex files, stores, templates, users, and other datasets. You can create a dataset and add the elements to the dataset at the same time, or you can create a dataset first and add the elements later. You also can delete an element from a dataset; note that this removes only the link in that dataset – not the element itself.
Creating a dataset
- Unable to render {include} The included page could not be found.
- Click
 Create at the top of the screen and then click Create a new dataset.
 - Enter the dataset name and click OK. The new dataset opens with the dataset name displayed at the top right of the window:

You also can create a new dataset when you upload a new resource to your repository.
Editing a dataset
You can edit (add, remove, download, delete, and share) resources in a dataset, delete a dataset, and toggle viewing public and private dataset and resource visibility.
- Unable to render {include} The included page could not be found.
- Click Browse > dataset.
- Click to select the dataset to edit. Continue to the section with the action to take.
Deleting a dataset
You can delete a dataset and all of its resources (images, files, etc.), or delete just the dataset and keep the resources in the Data Store.
- In BisQue, click
 at the top of the window.
 - Click either:
- Delete dataset and all its elements to delete the dataset and all its resources from the Data Store (the resources are still registered with BisQue).
–or– - Delete dataset only and keep elements to delete just the dataset but keep the resources in the Data Store (they will no longer be registered with BisQue).
- Delete dataset and all its elements to delete the dataset and all its resources from the Data Store (the resources are still registered with BisQue).
For more information, see Deleting a Resource.
Downloading a dataset resource
- In the dataset to download, click
 Edit to switch to edit mode, and then click the resource to download:
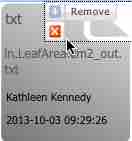
- Click
 and then click Download.
For more information, see Downloading Resources from Bisque.
Sharing a dataset
- In Edit mode in the dataset to share, click , and then click Share:

- To share with a collaborator, enter the first few letters of the user's name in the search field, select the user, and then click Add share.
- To delete a collaborator in the list, select the name and click
 .
. - To change the visibility of the resource, click either published (to switch to displaying the resource to everyone, with editing available only to the owner and collaborators) or private (to switch to displaying the resource only to the owner and list of collaborators). For more information, see Changing Resource Visibility to Published or Private.
- To turn off notifying the collaborator of the new share, clear the Notify users about new share checkbox.
- Click Done.
For more information, see Sharing BisQue Resources.
Renaming a dataset
For instructions on renaming a dataset, see Renaming a Dataset or Resource.
This Page Contains: